Resources
Below please find our smartPTZ FAQs. If you cannot find the answer to your question below, please email team@smartPTZ.com. Something missing, have a great idea, let us know.
BASIC[there is a lot you can do]
Going Live to YouTube [basic]
One phone, one stream, nothing else to buy — you’ll be live before your coffee cools.
Before you start: create a YouTube live event and have its server URL and stream key handy.
- Install smartPTZ and open Settings.
- Choose RTMP, then paste YouTube’s URL into Server URL and your key into Stream Key.
- Pick your streaming and recording quality — or just keep the defaults, they’re good.
- Mount the phone and aim your shot.
- Press Stream — and Record too if you’d like a full-quality local copy.
- Peek at YouTube’s live control room, confirm audio and video look right, and go live.

Want the camera to follow the action? Follow tracking works with one person even on a statically mounted iPhone — no gimbal needed, though a gimbal makes it even better.
Stream and Record [basic]
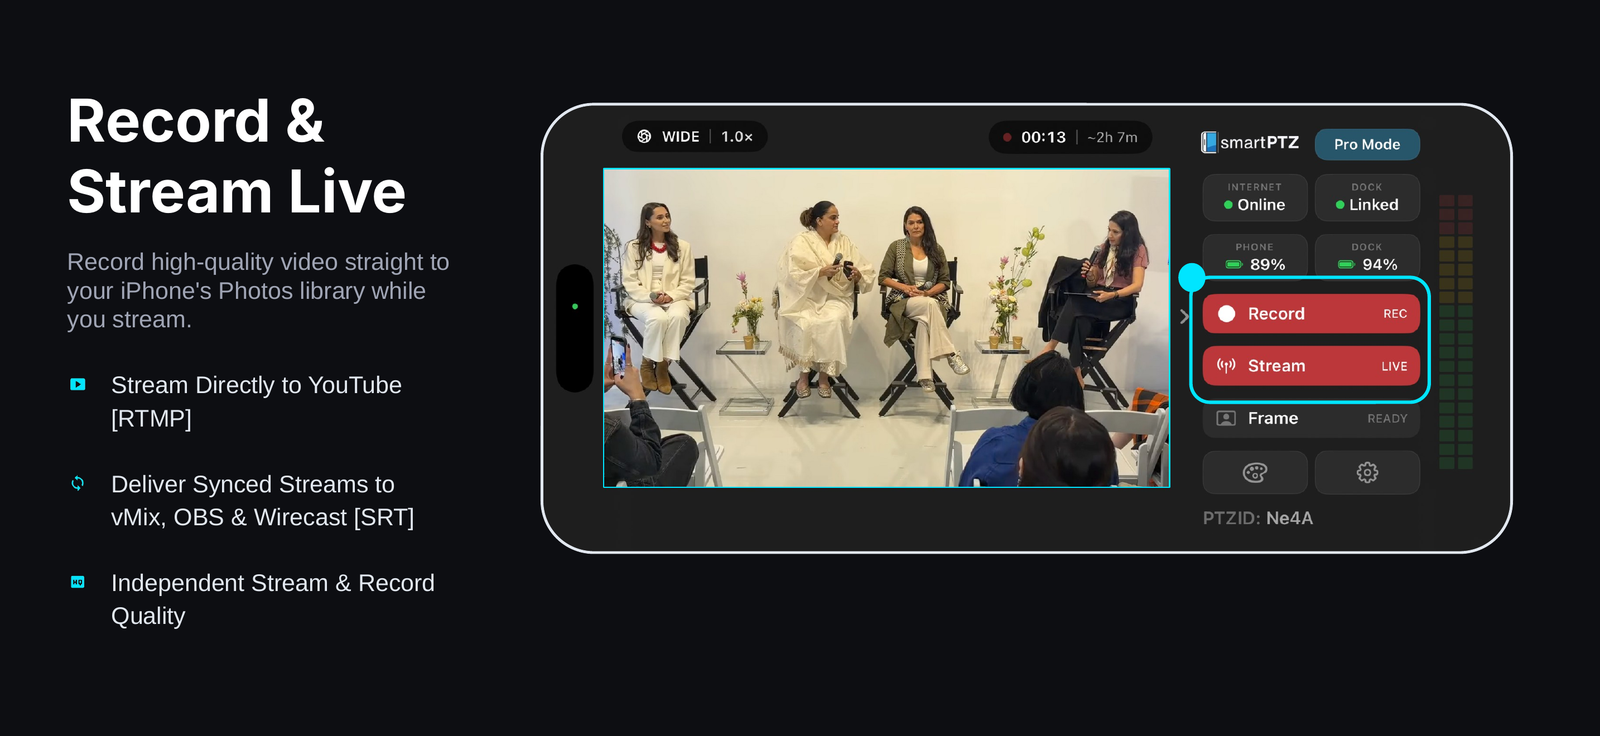
The basic smartPTZ app is free and includes streaming and recording, with control of color, exposure, focus, white balance and temperature — you can even use the AI tracking features. In the app’s Settings you can set your stream destination and choose the resolution and bitrate for streaming and recording independently.
Control Color, Exposure & Focus [basic]
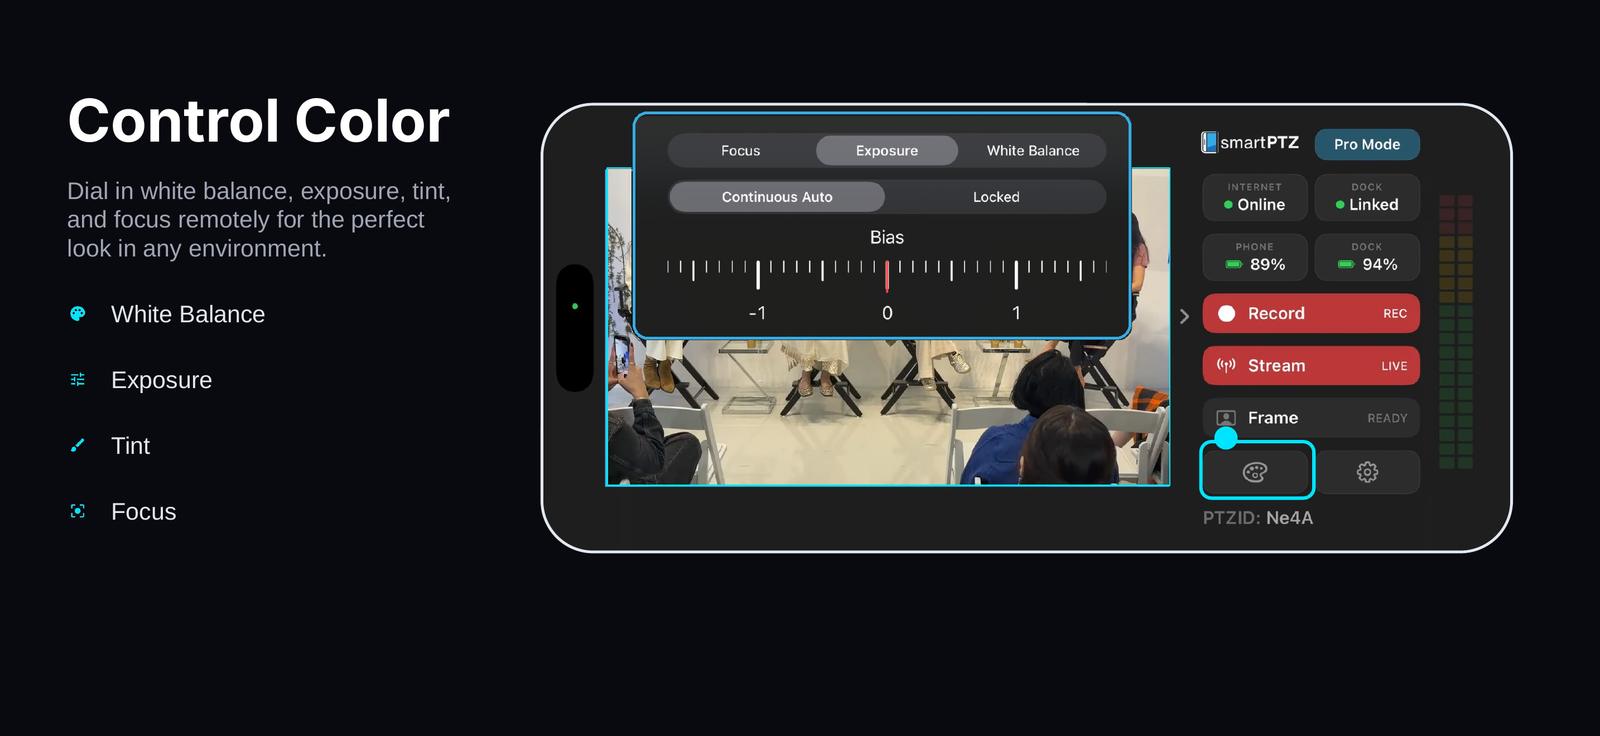
Dial in white balance, exposure, tint, and focus for the perfect look in any environment — free on the phone, and remotely from the Console with Pro. Touch the palette icon to open the color controls.
Very Tight Multi-Cam Sync [basic]
Within plus or minus one frame, with no drift.
On the phone
Every frame is timestamped the instant it’s captured. Each camera then holds its frames so the time from capture to send is identical on every phone — the fast one waits rather than running ahead.
On the network
SRT’s receiver holds packets for the latency you set and releases them on their timestamps, asking again for anything lost inside that window. Equal send times in, equal output times out.
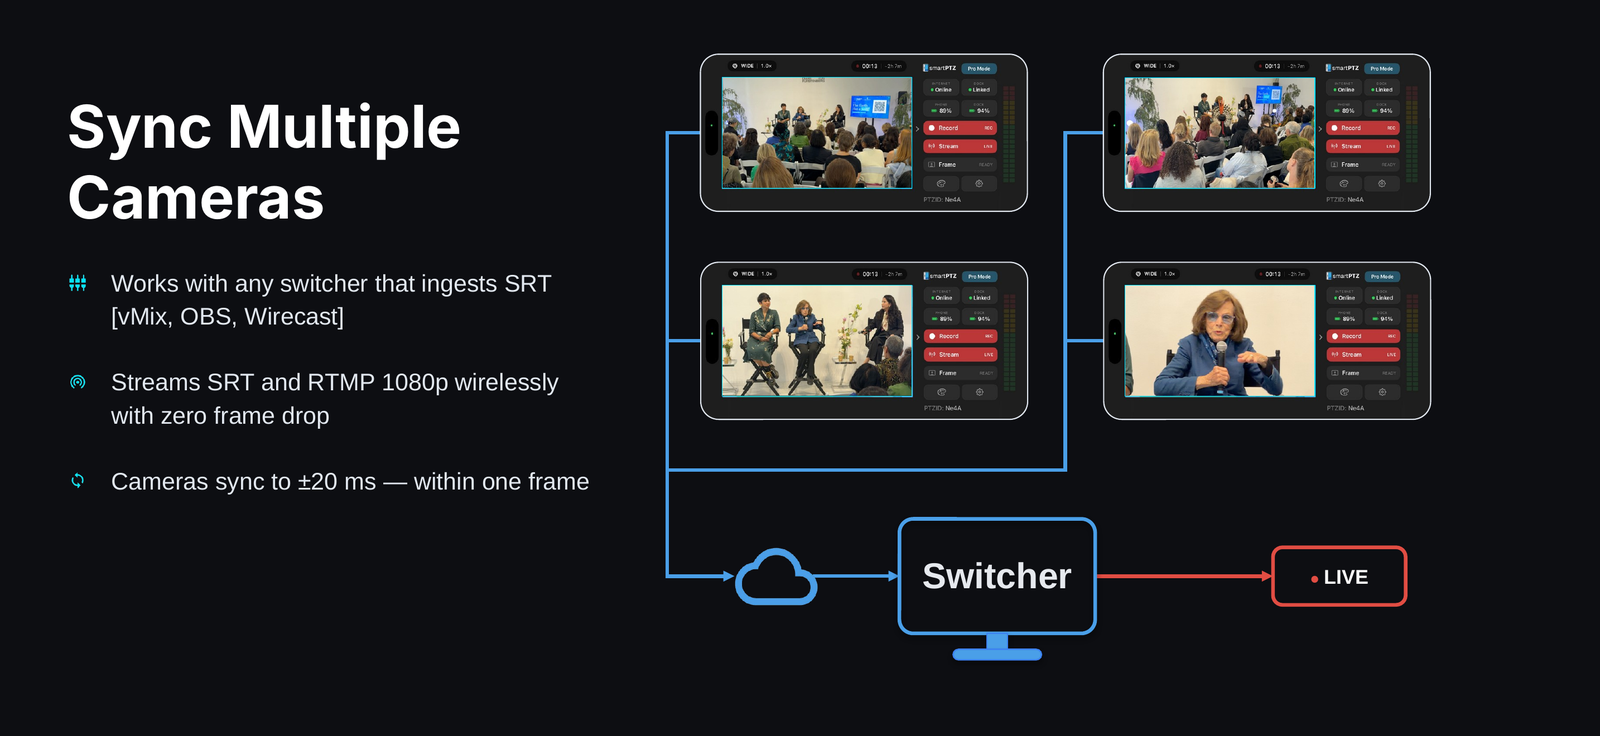
Measured under normal network and thermal conditions.
On-Screen Controls for Manual Operation [basic]
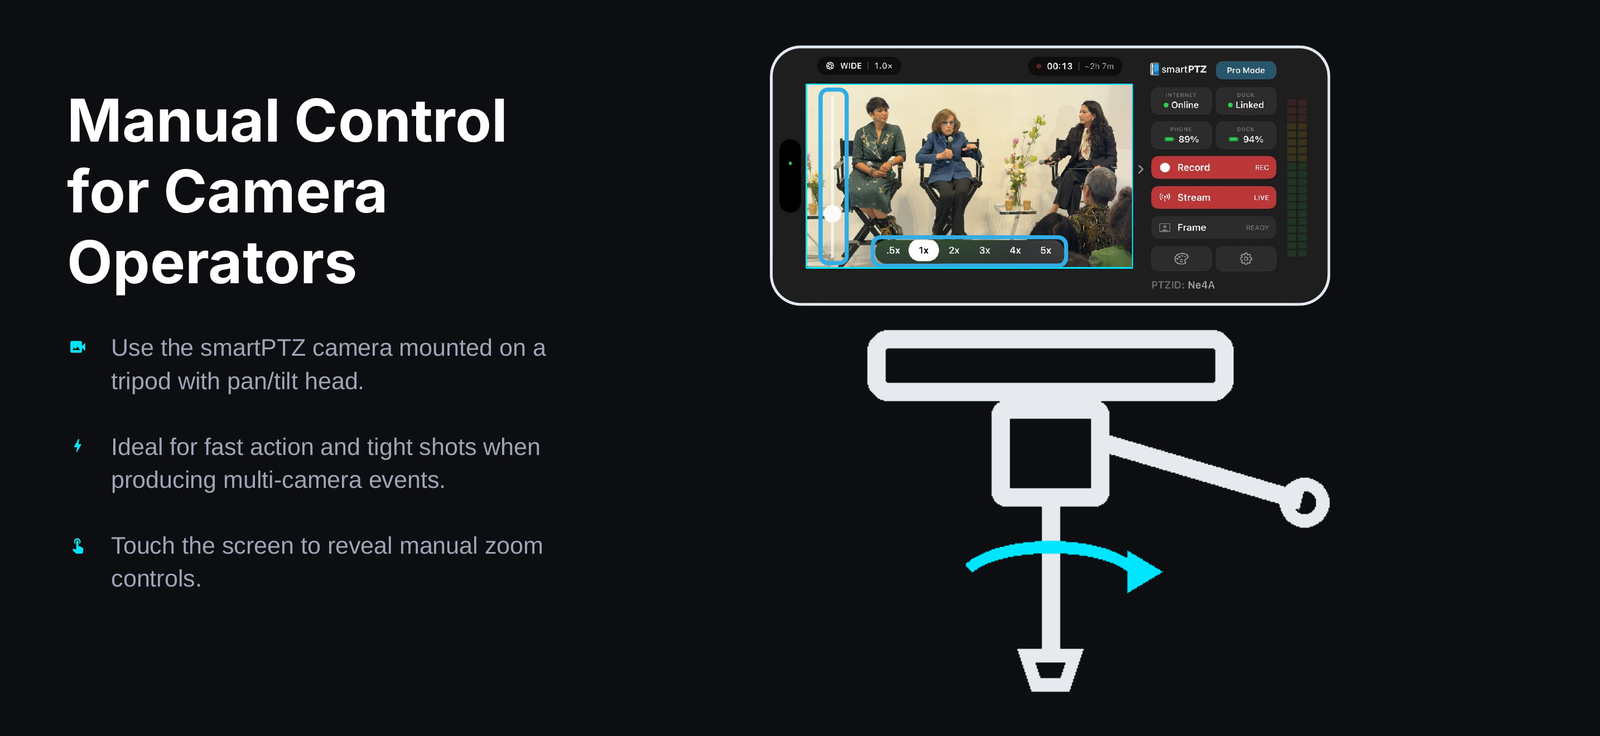
Prefer to drive the shot yourself? Mount the smartPTZ camera on a tripod with a pan/tilt head for fast action and tight shots on a multi-camera event — touch the screen to reveal manual zoom controls.
PRO[remote control opens up a range of capabilities]
Go PRO for Remote Control [Pro]
Pro adds remote control: the Console, Companion, and anything that reaches your camera from farther than arm’s length. Subscribe in the app, tap Go Pro on the camera view. Manage or cancel anytime from the app’s Settings.
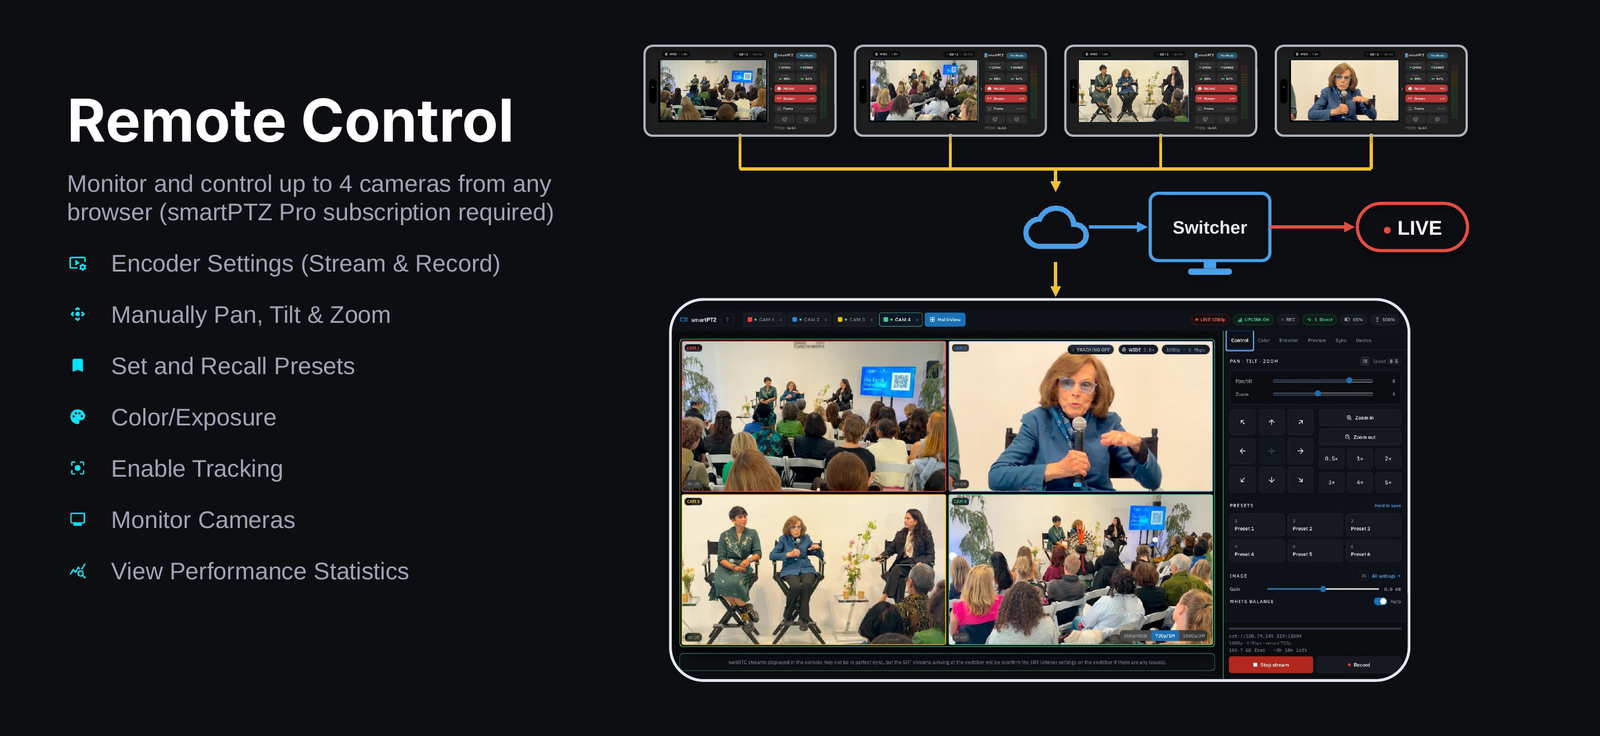
What happens when you subscribe
You get your own unique PTZ-ID right away. That little ID is what links your phone to the Console — type it in and you’re driving the camera live, from anywhere.
Pro Packages/Pricing
Every smartPTZ Pro plan is a monthly subscription and starts with a 1-month free trial. Pick your plan by how many cameras you’ll run — you can change it anytime.
Which bundle is right for you
- Single camera — streaming or recording an event with one camera, and controlling it from anywhere.
- 4 cameras — up to four phones on one subscription, all side by side in the Console.
- 10 cameras — producers running big shows, or a few crews out in the field at the same time.
Setting up a bundle
- Each phone claims its own PTZ-ID the first time it runs, and keeps it. The app shows you every camera on your subscription.
- Got more phones than seats? Nobody gets locked out — an extra phone shares the first camera’s ID, and can run that camera whenever the phone that owns it isn’t.
- Changing plans is painless: on a smaller plan the extra cameras simply become shared instead of disappearing.
- New handset? Issue it a fresh PTZ-ID from the app’s settings and the old one retires gracefully.
- Single phone camera$9.991 month free
- 4 camera bundle$19.991 month free
- 10 camera bundle$29.991 month free
One thing that really matters: sign every iPhone on a bundle into the same Apple ID. The subscription holds the cameras, not the handset — a phone on a different Apple ID can’t take one of your seats.
AI Tracking[using Apple AI for autonomous camera operation]
Frame
In Settings, or remotely, select Frame. Frame tracking is designed for someone who generally stays put — a lectern, a chair, a desk. As they move or reposition, smartPTZ holds a steady shot, even when one speaker hands over to the next (for example, speakers following one after another at a lectern).
* Frame AI Tracking can be engaged from the phone. It does not require a Pro subscription. It does require an Apple DockKit-enabled gimbal.
How it works
Frame AI Tracking observes the most prominent human subject in the frame when engaged. It then uses the pan/tilt capabilities of the gimbal in combination with zoom control over the wide and telephoto lens (if available).
Arm and engage
- Select Frame to arm — on-screen or remotely. This prepares the app to start tracking. Set the camera so the subject to be framed is centered in the preview.
- Select Frame again to engage — tracking is on. To turn it off, press Frame again.
Settings
Access and adjust in Settings > AI Tracking, on the phone or through the remote console.
- Alignment — where your subject sits: center, left or right.
- Fit — how tight the shot is: loose, medium or tight.
- Response — how quickly the camera follows: quick, moderate or slow.
The defaults — center, medium, moderate — suit most rooms just fine.
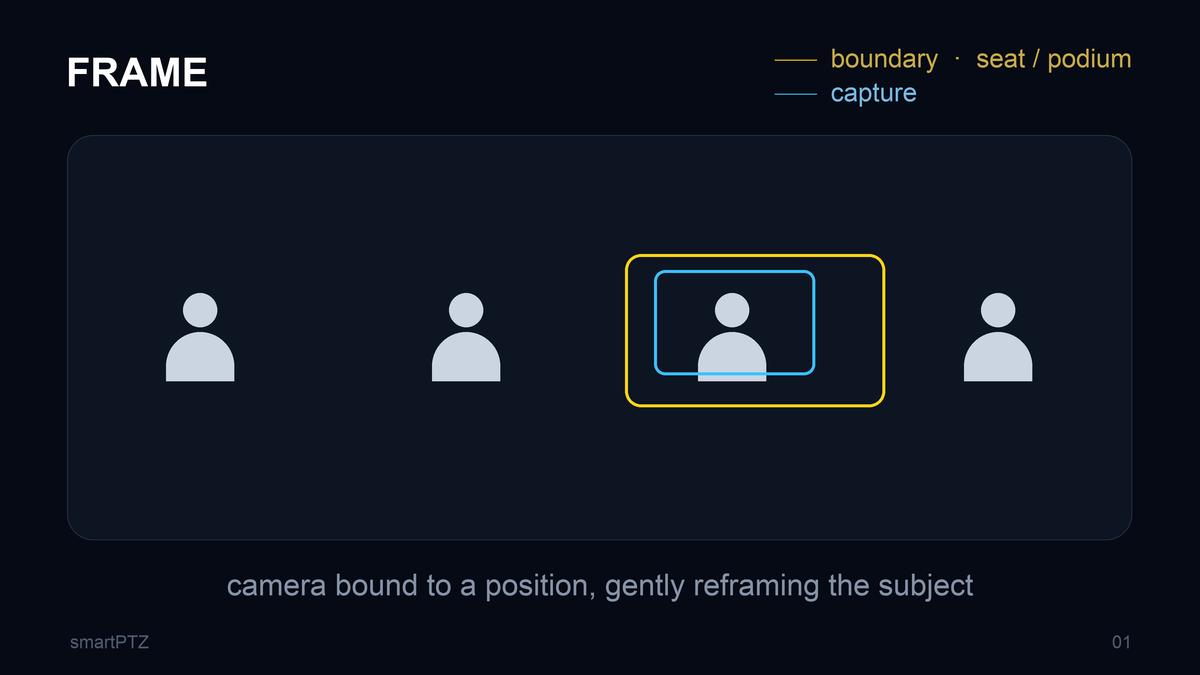
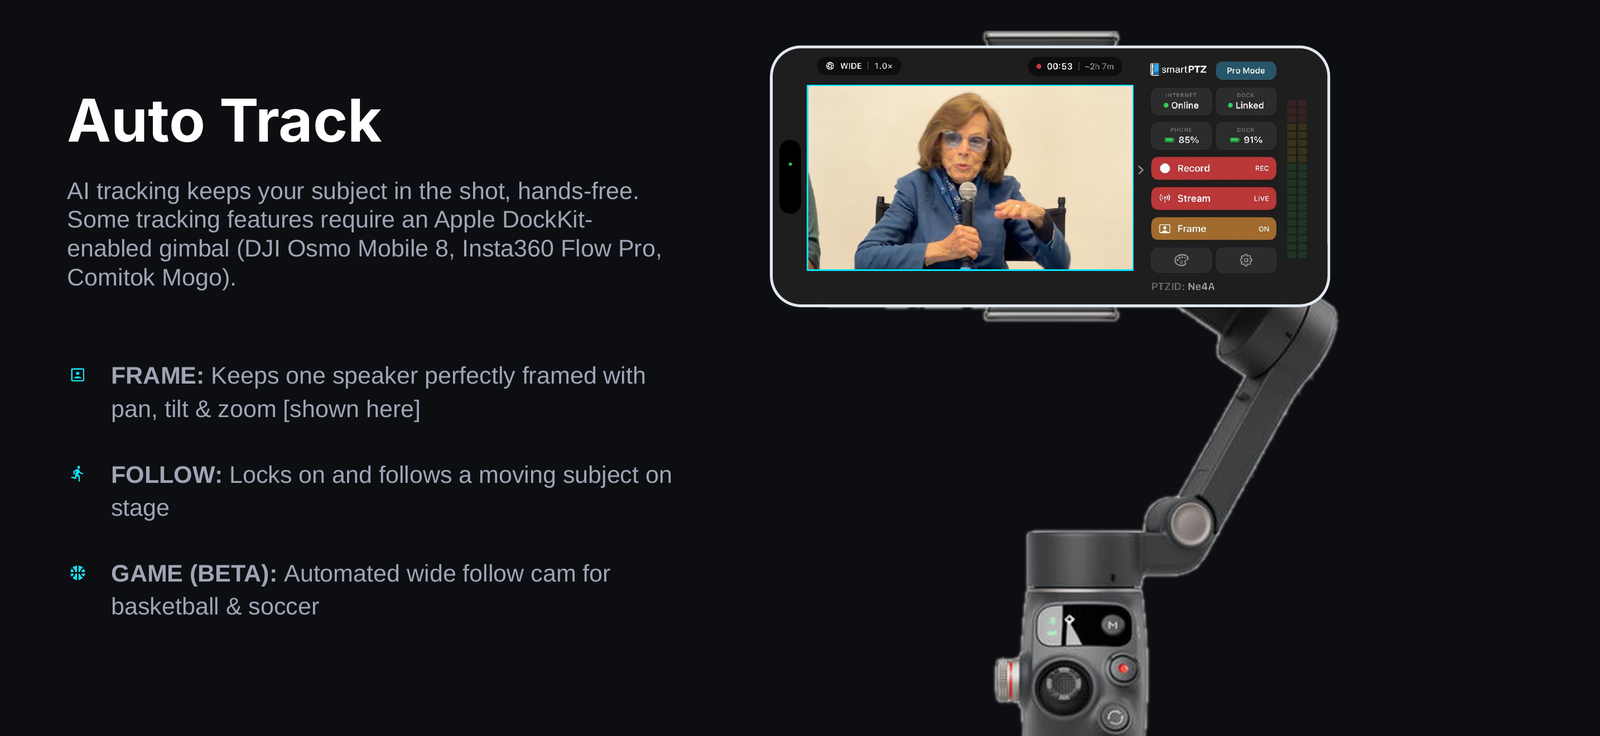
Frame doesn’t chase anyone who leaves — it holds its position and frames whoever arrives next. Perfect for a lectern, wrong for a presenter who roams. That’s what Follow is for.
Follow
In Settings, or remotely, select Follow. Follow is for one person on the move — a presenter working a stage, a demo, a workshop — keeping them in the shot while the phone itself stays perfectly still.
* You do not need a Pro license or a gimbal to use this feature. In future releases we will be adding multiple-person tracking, and tracking that also engages multiple lenses and the gimbal.
How it works
Follow uses the ultra-wide camera (4K) to observe the stage, field or court. It then creates a virtual camera (1080p) that operates within the ultra-wide camera’s full field of view.
Arm and engage
- Set the camera on a tripod pointed at the stage, field or court.
- Select Follow — zoom moves to 0.5× (the ultra-wide camera).
- Reset the camera/tripod position with the full stage, field or court in view. This preview is used to set the boundaries.
- Select Follow to engage. The camera zooms in on and tracks the single most prominent person in its preview frame. Select Follow again to turn off tracking.
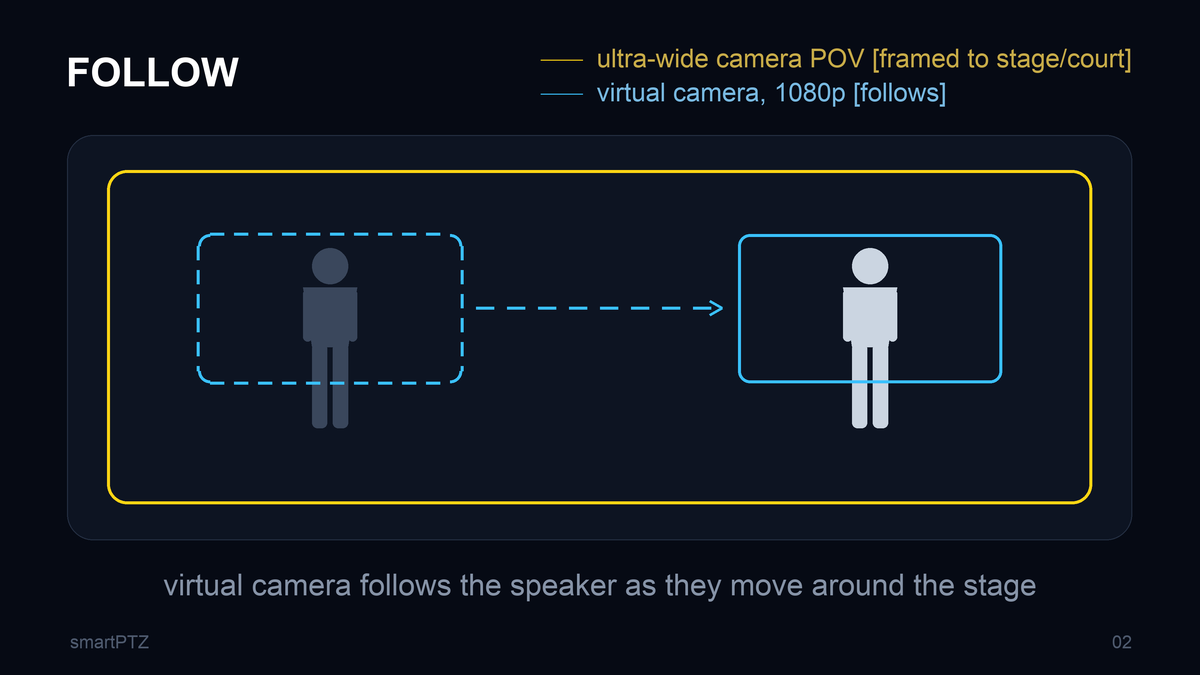
This only works with one clear presenter in the preview frame.
Game (beta)
In Settings, or remotely, select Game. Game is for a whole court or field — it follows the play rather than a person, so one phone on a tripod at half-way covers the whole pitch.
* You do not need a Pro license or a gimbal to use this feature. Game is in beta.
How it works
Game watches the whole playing area on the ultra-wide camera and creates a virtual camera that follows the cluster of play — the group of players — rather than any one person, keeping the action framed as it moves around the court or field.
Arm and engage
- Set the phone on a tripod — at half-way is ideal.
- Select Game to arm, then aim the home position so the whole playing area is in view.
- Select Game again to engage — the tracker takes it from there. Select Game again to turn off tracking.
Camera placement
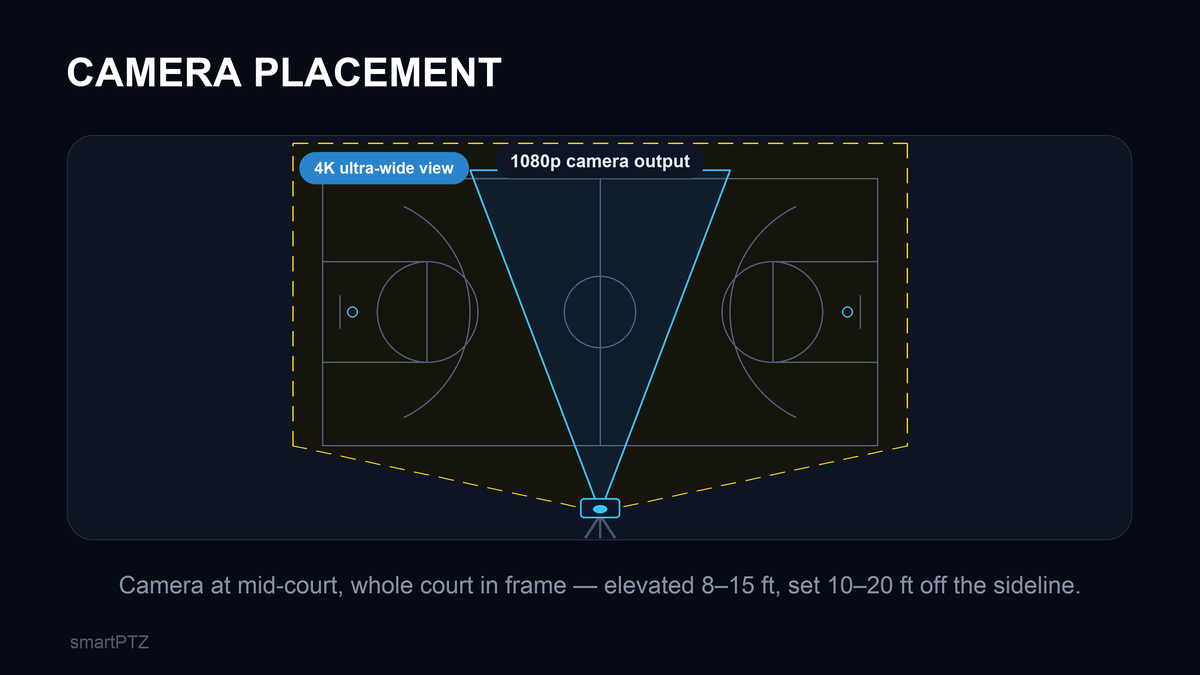
Set the phone at mid-court with the whole court in frame — elevated 8–15 ft and 10–20 ft off the sideline works well.
Settings
Access and adjust in Settings > AI Tracking, on the phone or through the remote console.
- Sport — Basketball 5v5, Soccer 7v7, or Solo for testing an angle. It tells the tracker how to read a cluster of players.
- Pace — Fast or Moderate. This is about the game, not the camera.
- Gimbal — off by default. Turn it on when the field is wider than the lens can see from where the phone sits.
- Manual tuning — leave it off and the sliders simply show the preset for your sport and pace.
The three sliders
- Tightness — how close the shot sits to the players. Full left is edge to edge; right tightens around the group.
- Lead — how far ahead of the play it aims. Raise it if the frame lags fast breaks; lower it if the camera overshoots on turnovers.
- Smoothness — higher looks calmer but arrives later; lower looks alert but can feel twitchy.
Change one slider at a time and watch a full possession before touching another. Sport and pace lock while Game is running.
Help us test it — Live Sports Producers wanted
This AI Tracking feature needs testing. There are a range of observations being made, and rules being applied and balanced. We’re looking for Live Sports Producers to collaborate with.
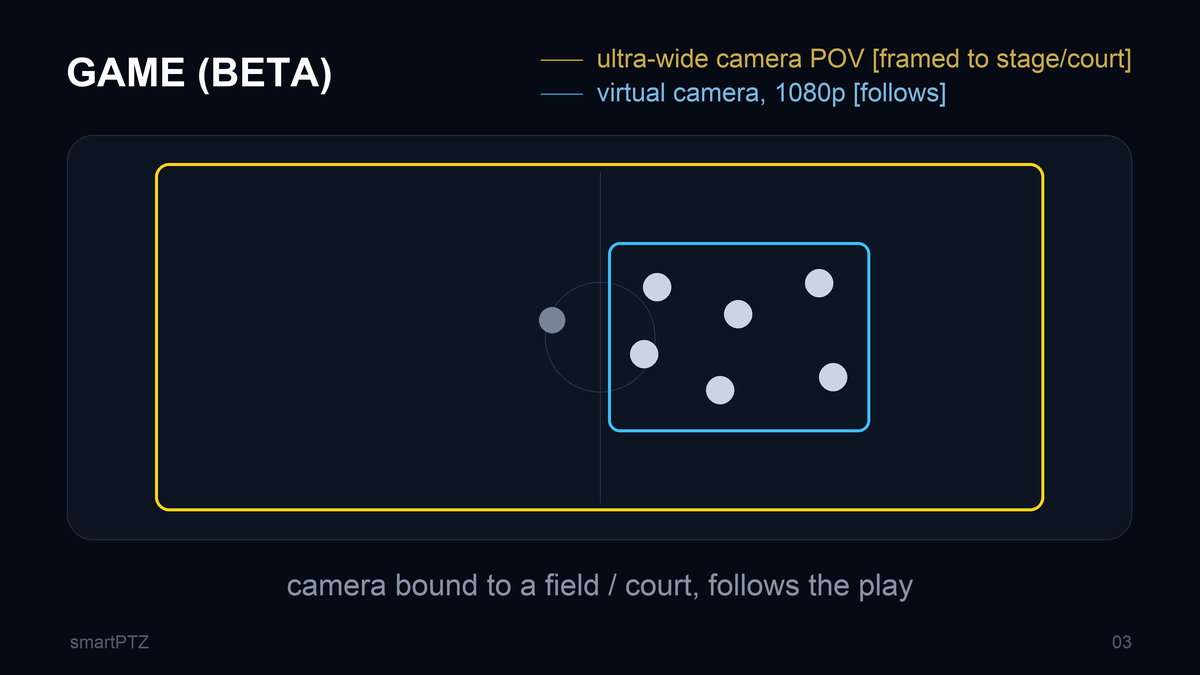
Basketball 5v5 and Soccer 7v7 are the shipped presets. A tip from our testing: youth games usually want less lead than varsity.
Using with vMix and Companion
smartPTZ bitfocus Companion
Put your cameras on real buttons — a Stream Deck, or a virtual control surface, Companion’s buttons on an iPhone, tablet, or local browser.
What it controls
- Stream and Record
- Set and Recall Presets
- Pan, Tilt and Zoom
- Color, Exposure, Focus
- Encoder Settings
Setting it up
- Download and install Bitfocus Companion if you’re not already a user — it’s free (link below).
- In Companion, under Modules > Import Module Package, import the smartPTZ module.
- Under Connections > Add New Connection, search for smartPTZ and add the smartPTZ module to your current Companion configuration.
- Under Connections, search for and add the smartPTZ-module-X.
- Paste the smartPTZ camera’s PTZ-ID into the module field.
- Repeat: add a smartPTZ module for each camera — one per PTZ-ID.
- Add smartPTZ control buttons to your Companion configuration: under Buttons > Presets > smartPTZ-module-X, drag and drop smartPTZ camera controls to build a custom control surface — usable in the browser and on connected Stream Decks.
Think of it this way: the Console is for setting cameras up, Companion is for running them once the show has started.
smartPTZ with vMix
vMix and Companion users: here’s a template for a 4-camera production — a smartPTZ vMix session plus a matching, pre-configured smartPTZ Companion configuration. The vMix session ingests four live SRT streams with the listener settings already dialled in.
Assumes: 1–4 iPhones running smartPTZ Pro (collect each camera’s PTZ-ID first); the free Bitfocus Companion app installed, with the smartPTZ Companion Module already imported; and the vMix session and Companion running on the same computer, with vMix’s local Web API enabled (on by default).
Set it up
- Download the Companion configuration (link below).
- In Companion, Import → select the smartPTZ Companion configuration → Full Import.
- In Companion, open Connections and paste your PTZ-IDs into each of the four smartPTZ-module fields.
- Open the vMix session, and set the iPhones to stream SRT to the vMix SRT listener (IP/port).
- Control it with a Stream Deck, or a virtual/soft Companion surface in a browser — or with CyberDeck (a free iPhone app, great for remote-controlling from anywhere, on- or off-site).
* Each camera must be online — the app open and in the foreground, connected to the Internet.
Other Important Information
Stream Cams to SRT-Enabled Switchers [using free VPN software]
Easily connect smartPTZ cameras to live production switchers — vMix, OBS, and Wirecast — as if every device were in the same room, behind a common firewall with static local IP addresses.
The cameras, the vMix computer, the Companion app, and the producers/directors can all connect and control the system remotely, and receiving SRT becomes very easy. Tailscale is free — we like it and use it. It’s smart, robust, and free.
Our implementation
- Create a Google account for your smartPTZ production team.
- Install Tailscale on every device you’ll use for a production, series, or kit — usually the iPhones, the vMix computer(s), and any phones, tablets or computers you’ll use to control the production (the cameras and vMix).
- Log in to Tailscale on all of them with that same production-team Google account. Each device joins your private VPN without dropping its existing network connection — their Tailscale IP addresses all start with 100.
Why it helps
- No static public IP required for the vMix / controller computer.
- Camera → vMix: the cameras send SRT to the vMix computer using its Tailscale IP.
- Companion controller: the producer reaches the controller using the vMix computer’s Tailscale IP.
Audio sources and ingest
The app starts on whatever input your phone is already using, and follows along if that changes.
How it picks an input
- On launch it takes the phone’s current audio input — the built-in microphone unless something else is attached.
- Plug in or remove a device mid-session and the app moves to the new route on its own.
- Want something specific? Choose the input in Settings on the phone. (The Console has no audio-source control.)
Tested with
- The iPhone’s built-in microphone
- Most USB-C audio devices
- Røde Wireless GO / PRO
- Apple Bluetooth headphone microphones
If you can, attach your USB-C interface before starting the camera. A mid-session change is handled fine — but settling audio first is one less thing to think about as you go live.
Ingesting Audio From an Audio Mixer [using the Rode Go]
Feed the program mix from your audio board straight into a smartPTZ camera. A Rode Wireless GO carries the mixer’s output to the iPhone over its USB-C receiver, so the app ingests a clean board feed instead of room or on-camera mics.
The signal chain
- Take a program / line-level output from your mixer or the room’s audio system (usually XLR — a wall port or a cable from the onsite audio tech).
- Attenuate it to mic level with a variable XLR inline pad. We use a 6-position, −50 dB attenuator (Sescom SES-MULTI-PAD-2), typically set around position 4 (−30 dB) and adjusted to taste on a mic check.
- Convert XLR → 3.5 mm with an XLR-female-to-⅛-inch cable, from the attenuator.
- Plug that 3.5 mm into a Rode Wireless GO transmitter (the same port that takes a lavalier).
- Connect the Rode receiver to the iPhone over USB-C — smartPTZ automatically ingests the USB-C source.
Line level runs far hotter than a mic input, so the pad is what converts it to a clean mic-level feed and keeps it from distorting. Always sound-check every mic before going live.
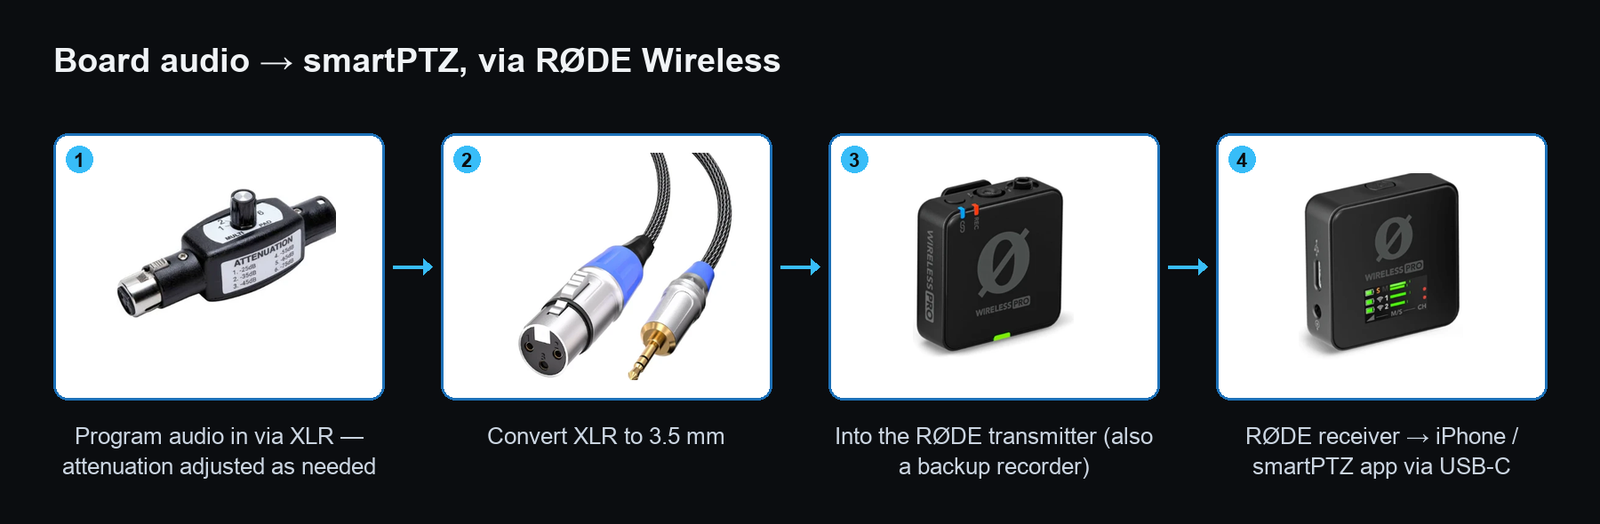
Physically mounting the USB-C receiver to the gimbal
- Glue a cold-shoe mount to the gimbal arm/joint — a dab of Gorilla Glue holds it firmly.
- Attach the receiver to the iPhone with a short USB-C cable; a 90° connector keeps it tidy on the rig.
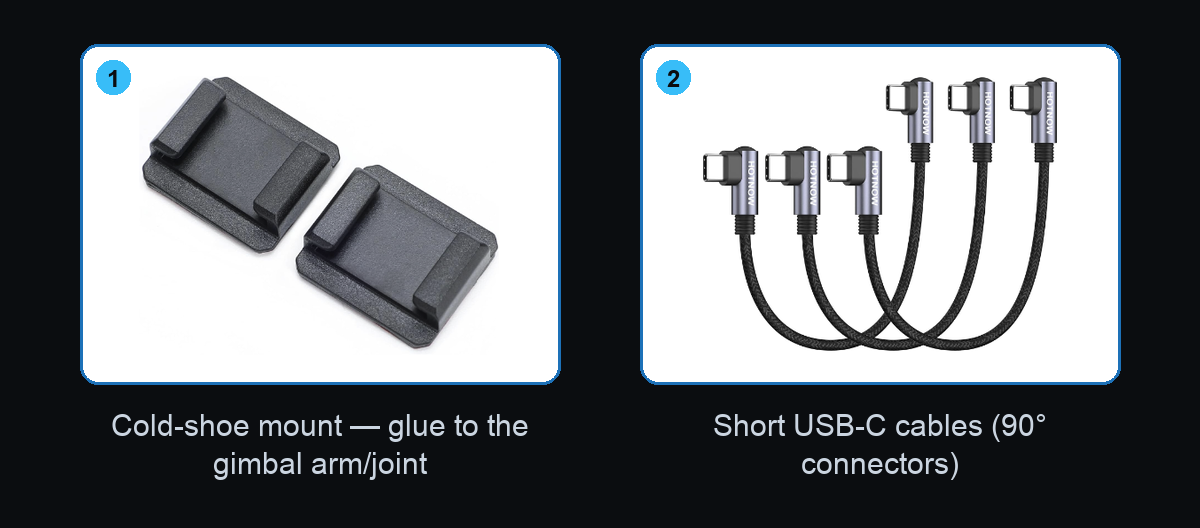
A board feed is the cleanest audio you can give the app — the same mix your PA or recording gets — with no dependence on the phone’s mic or room acoustics.
Run time: two hours, or five with a USB-C power bank
Two hours on the phone’s own battery. Five or more with external power.
On the phone alone
Two hours is a full battery with the camera flat out: streaming 1080p and recording 4K at the same time, screen on, nothing plugged in. AI tracking, a gimbal sipping from the connector and a warm room all take their share.
With a USB-C power bank
The phone runs and charges at the same time, so run time stops being about the phone’s battery and becomes about how much capacity you bring.
- Use a USB-C PD bank rated 20 W or more, so it outruns the draw rather than just slowing the drain.
- Capacity sets the hours — a 10,000 mAh bank is roughly another full charge.
Every camera’s battery percentage sits right in the Console header — you’ll see which phone needs power long before it becomes a problem.
Why smartPTZ and not another SRT encoder (Blackmagic or Larix)?
Because a standalone encoder sends each frame the moment it’s ready — and “ready” is a different moment on every phone.
With one camera, no problem at all
An encoder app that pushes frames out as fast as it can is doing the right thing, and SRT’s receiver latency smooths out the network. Nothing to fix.
With two or more, it matters
Encoding never takes the same time on every phone. Model, thermal state, resolution and what the tracker is doing all move it — and they keep moving during a show. Each camera puts its frames on the wire at a slightly different age; SRT can even out the journey, but not the head start. Your cameras reach the switcher out of step, and the gap wanders.
What smartPTZ adds
Every frame is timestamped at capture, and each camera holds its frames to a common pad before sending — the quick phone politely waits for the slow one. The encoding pipeline gets the same discipline SRT gives the network: frames captured together are sent together, and arrive together.
And yes, there’s everything else too — pan, tilt and zoom, presets, the Console, Companion, AI tracking. But the sync is the part no other encoder can be configured into giving you.
Can’t preview your camera in the Console?
Nine times out of ten it’s the network, not the camera.
Check in this order
- Is webRTC on for that phone? There’s a switch per camera on the Console’s Preview tab.
- Is UDP getting through? Guest and corporate networks often block it — try the phone on cellular and see if the preview appears.
- Enough bandwidth? Four previews at once is a real load. Try one camera on its own first.
The good news: a preview that won’t connect never touches your live stream. SRT and RTMP take a different route and carry on regardless.
Does smartPTZ rely on good internet? Yes.
Control, streaming and previewing all need a connection. Recording doesn’t.
- The phone records locally, and couldn’t care less whether it can reach the internet.
- Previewing several cameras in the Console while also streaming them to a switcher uses serious bandwidth — in both directions, at the same time.